How To Thread A Sewing Machine: Guide For Beginners
Introduction
The Question: How to Thread a Sewing Machine? It matters a lot. It controls stitch quality and machine performance. Good threading prevents skipped stitches and bird’s nests. It also saves time and protects your needle and fabric.
When threading goes wrong, the fix is usually simple. You adjust one step, and the machine behaves. So let’s start clean and avoid the usual traps.
Common mistakes to watch for:
- Skipping a thread guide on the path.
- Threading with the presser foot down (tension discs stay closed).
- Dropping the take-up lever out of the thread path.
- Inserting the bobbin in the wrong direction.
- Not pulling both thread tails to the back before sewing.
- Using old, fuzzy, or mismatched thread.
- Forgetting to raise the needle to its highest point.
We’ll keep things simple, clear, and fast. First, you’ll see what you need. Then, you’ll follow short steps that work on most machines. Finally, you’ll learn quick fixes if something still looks off.
Tools & Resources Needed
A few simple tools make threading fast and stress-free. Gather these first. Then you won’t stop mid-step.
Must-haves
- Spool of quality thread
Use all-purpose polyester for most fabrics. It sheds less lint and feeds smoothly. - Matching bobbin
Use the bobbin type your machine requires. Wrong bobbins cause tension problems. - Correct needle (type + size)
Start with a Universal 80/12 for woven fabric. Use Ballpoint 75/11 for knits. - Sharp thread snips or small scissors
Clean cuts prevent fraying and missed catches at the needle. - Good light
A desk lamp helps you see the guides, the take-up lever, and the needle eye. - Machine manual or threading diagram
Every brand routes threads a bit differently. Keep the guide within reach.
Optional but Helpful
- Lint brush
Brush the bobbin area before threading. It reduces jams and skipped stitches. - Tweezers
Grab short thread tails near the needle and bobbin case with ease. - Needle threader (built-in or handheld)
It speeds up the final step, especially with fine needles. - Seam ripper
Clear tiny snags and lift thread from tight spots without damage. - Small screwdriver
Tighten the needle clamp or open the needle plate when needed. - Scrap fabric
Test stitches after threading. Adjust tension before sewing your real piece. - A drop of machine oil (model-approved)
Only if your manual says so. One drop keeps the movement smooth.
Quick Prep Checklist
- Turn the machine off.
- Raise the needle to its highest point.
- Lift the presser foot to open the tension discs.
- Place the spool on the pin and keep thread tails neat.
Why this matters: Good tools and a clean setup prevent tangles, birds’ nests, and uneven tension. Also, they make the next steps simple and repeatable.
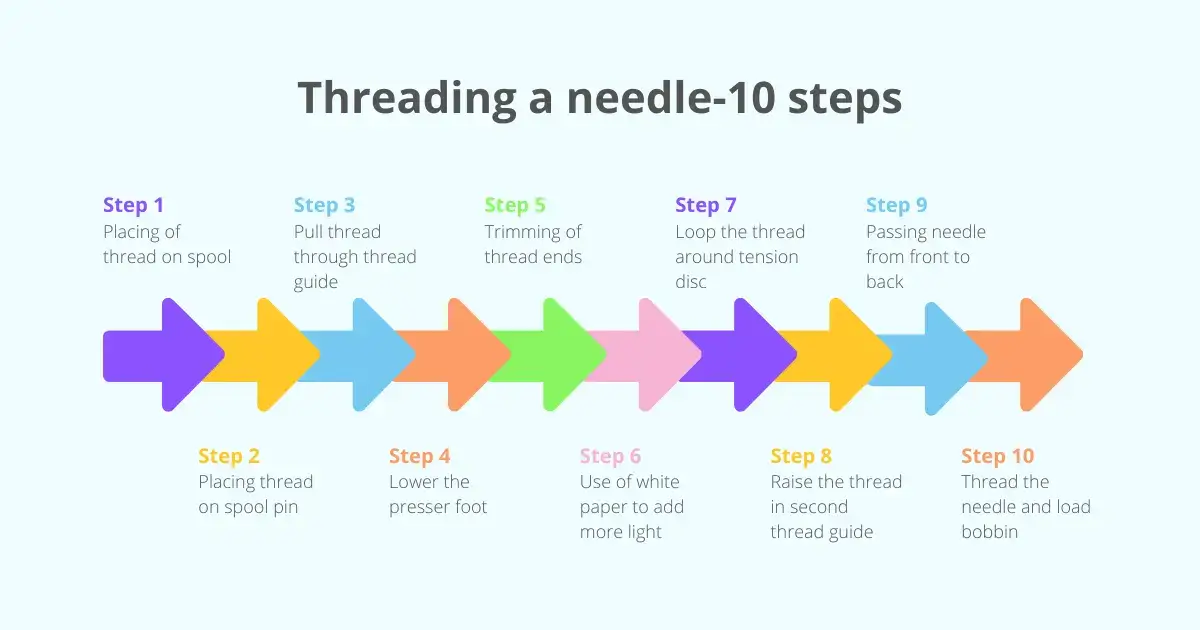
How to thread a sewing machine | Step-by-Step Guide / Process
Follow these simple sewing machine threading steps. Keep your manual nearby. Small changes make a big difference.
Threading the Upper Thread
Prep
- Turn the machine off. Safety first.
- Raise the needle to the top using the handwheel.
- Lift the presser foot. This opens the tension discs.
Route the thread
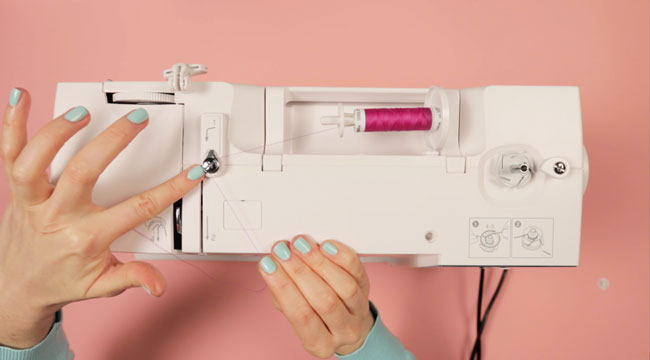
- Place the spool on the pin. Add the cap if your model uses one.
- Pull the thread to the first guide at the top of the machine.
- Bring it down the right channel toward the tension area.
- Slide the thread between the tension discs. Keep it snug, not tight.
- Go up the left channel and through the take-up lever. Make sure it’s seated.
- Bring the thread down again through any lower guides above the needle.
- Thread the needle. Front to back on most home machines.
- Use the built-in threader if you have one.
Quick checks
- The thread sits in the take-up lever, not around it.
- The presser foot stayed up while routing.
- You left a 15 cm (6 in) tail.
Why this works
- Open tension discs let the thread seat correctly.
- A correct path prevents skipped stitches and thread nests.
Threading the Bobbin (Wind + Insert)
Wind the bobbin
- Place the spool on the pin.
- Guide the thread to the bobbin winder as your diagram shows.
- Thread the bobbin through its small hole (inside to outside).
- Push the winder to the engaged position.
- Hold the tail, start winding, then trim the tail.
- Wind until two-thirds full. Do not overfill.
- Cut the thread and remove the bobbin.
Insert the bobbin
Check your machine type. The direction matters.
- Top-loading (drop-in) case:
- Drop the bobbin in the case.
- Pull the thread into the slot and along the tension spring.
- Follow the arrow on the cover. The bobbin usually turns counterclockwise.
- Front-loading case:
- Place the bobbin into the metal case with the tail out.
- Pull the thread under the spring until it clicks.
- Insert the case into the hook until it locks.
Quick checks
- The bobbin turns in the correct direction for your model.
- The thread moves smoothly with gentle tension.
Bring Up the Bobbin Thread
- Hold the needle thread with your left hand.
- Turn the handwheel toward you one full turn.
- The needle goes down and up, catching the bobbin loop.
- Pull the needle thread to lift the bobbin thread through the needle plate.
- Grab both tails and pull them under the presser foot toward the back.
Test before you sew
- Place scrap fabric under the foot.
- Lower the presser foot and take 5–6 stitches.
- Check for smooth, even stitches. Adjust only if needed.
Pro tips (save time and stress)
- If the thread jumps out while sewing, you likely missed a guide. Re-thread.
- A fuzzy or old thread causes snags. Fresh, low-lint thread feeds better.
- Always turn the handwheel toward you. The other way can tangle the hook.
These sewing machine threading steps cover the upper thread, the bobbin threading guide, and how to bring up the bobbin thread. Follow them once, and you’ll feel the difference on your very next seam.
Common Mistakes & Fixes – Troubleshooting
When sewing goes wrong, small fixes usually help.
Check the likely causes below. Each entry shows the symptom, the cause, and a quick fix.
Missing thread guides → slips or poor tension
Symptom: Thread slips or stitches look loose.
Cause: Thread skipped one or more guides.
Fix:
- Stop sewing. Raise the needle and presser foot.
- Re-route the thread from the spool through every guide.
- Make sure the thread sits in the tension discs and take-up lever.
Prevent: Always follow the machine’s diagram while threading.
Presser foot down while threading → bad tension seating
Symptom: Stitches are inconsistent after threading.
Cause: You threaded with the presser foot down.
Fix:
- Lift the presser foot before routing the thread. This opens the tension discs.
- Re-thread the upper thread with the foot up.
Prevent: Make lifting the presser foot part of your routine.
Bobbin inserted backwards or wrong bobbin type
Symptom: Poor stitch formation or looping under the fabric.
Cause: Bobbin turns the wrong way or is the wrong size.
Fix:
- Remove the bobbin. Check the arrow or manual for the correct direction.
- Use the bobbin type your manual requires. Replace if unsure.
Prevent: Keep spare, correct bobbins labeled by model.
Fluff or lint in the bobbin area → thread jams
Symptom: Thread bunches or machine jams.
Cause: Lint blocks the hook or tension spring.
Fix:
- Remove the bobbin case or cover. Brush out lint.
- Use a lint brush or small vacuum. Avoid excessive oiling.
Prevent: Clean the bobbin area weekly or after heavy sewing.
Tension imbalance: too tight or too loose
Symptom: Upper or lower thread shows on the opposite fabric side.
Cause: Upper or bobbin tension is off.
Fix:
- Re-thread both the upper thread and the bobbin first.
- Test with scrap fabric. Make tiny tension changes (1 click).
- If bobbin tension seems wrong, check bobbin placement or replace the bobbin.
Prevent: Re-thread before each project. Adjust slowly and test.
The thread breaks frequently
Symptom: Thread snaps while sewing.
Cause: Old, weak, or poor-quality thread; sharp or bent needle; improper threading.
Fix:
- Replace old thread with good good-quality, low-lint thread.
- Change the needle if it is bent or dull.
- Re-thread following the correct path and keep tails neat.
Prevent: Match the thread and needle to your fabric.
Skipped stitches
Symptom: Stitches skip, and the fabric shows gaps.
Cause: Incorrect needle type/size, wrong threading, or damaged needle.
Fix:
- Use the proper needle for your fabric.
- Re-thread upper and lower threads.
- Replace the needle if it’s bent or worn.
Prevent: Change needles after 6–8 hours of sewing or at the first sign of trouble.
Bobbin wound unevenly or overfilled
Symptom: Uneven stitches or bobbin skips while sewing.
Cause: Bobbin wound too tightly or unevenly.
Fix:
- Rewind the bobbin more evenly. Stop when the bobbin is two-thirds full.
- Do not overfill.
Prevent: Hold the thread tail lightly while winding for even tension.
The handwheel turned the wrong way
Symptom: Hook clatters or thread tangles when you try to bring up the bobbin.
Cause: Turning the wheel away from you can misalign parts.
Fix:
- Always turn the handwheel toward you (counterclockwise on most machines).
- Bring up the bobbin thread again gently.
Prevent: Make this a habit when testing or setting up.
Incorrect threading order (take-up lever missed)
Symptom: Upper thread slips out of the take-up lever or loops form.
Cause: The Thread did not go through the take-up lever.
Fix:
- Raise the needle and presser foot. Re-thread and ensure the thread goes through the take-up lever.
Pull a 6–8 cm tail under the presser foot.
Prevent: Pause at every major guide when you re-thread.
Quick troubleshooting checklist (use this flow)
- Identify the symptom.
- Re-thread the upper thread with the presser foot up.
- Check bobbin type and direction.
- Clean the bobbin area.
- Replace the needle if needed.
- Test on scrap fabric.
- Adjust tension by small steps.
- If still bad, consult the manual or seek professional service.
When to call a technician
- The machine makes unusual metal sounds after cleaning.
- Stitches still fail after re-threading and tension checks.
- Timing issues (needle and hook timing off) — a technician must fix this.
Resources & further reading
Also, check your machine manual for diagrams and model-specific steps.
For clear diagrams and extra tips, see the sewing machine guides at your local library or reputable suppliers such as Direct Sewing Machines & Supplies and USU Library resources.
Variations by Machine Type
Different machines thread slightly differently. Know your machine type first. Then follow the model’s diagram. Below are clear brand and type notes plus quick fixes.
Singer (home mechanical models)
- Older Singer models use numbered arrows on the body.
- Follow arrows exactly; they show the full thread path.
- Many Singers use a front-loading metal bobbin case.
- Insert the bobbin with the tail under the tension spring.
- If stitches loop, recheck bobbin direction and seating.
- Pro tip: re-thread both top and bobbin if problems persist.
Brother and Janome (computerized/home models)
- These brands often include clear diagrams near the spool or under covers.
- Many models use a top-loading, drop-in bobbin for fast insertion.
- They commonly have a built-in needle threader; use it to save time.
- Lift the presser foot before threading to seat the tension discs.
- If the bobbin won’t feed, check the drop-in slot for lint.
- Pro tip: Use the model number plus “threading diagram” to find the manual.
Juki, Consew, and Industrial Machines
- Industrial machines use stiffer threads and heavier-duty parts.
- They require precise routing through extra guides and pre-tensioners.
- Turn the handwheel slowly when bringing up the bobbin thread.
- Timing and tension matter more at high speeds; test carefully.
- If timing feels off, stop and call a technician.
- Pro tip: Clean and oil frequently according to the manual.
Vintage & Mechanical Machines
- Vintage machines may need model-specific bobbins and cases.
- They often use metal bobbin cases rather than drop-in bobbins.
- The thread path may look different from modern machines.
- Use gloves to remove grime before re-threading older parts.
- Pro tip: source original bobbins to avoid tension issues.
Serger / Overlocker
- Sergers use multiple threads and loopers, not only needles.
- Thread each looper and needle in the proper sequence.
- Incorrect looper threading creates tangled stitches instantly.
- Always keep a serger threading chart handy for quick reference.
- Pro tip: mark your thread spools to keep colors and paths clear.
Top-loading vs Front-loading Bobbin Notes
- Top-loading (drop-in) bobbins sit flat and often rotate either way.
- Front-loading bobbins sit in a removable metal case and have direction rules.
- Always check the manual for the correct rotation direction.
- Test on scrap fabric after inserting the bobbin to confirm smooth feed.
Automatic Needle Threaders & Special Features
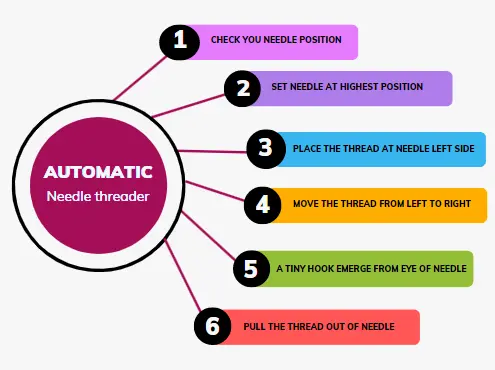
- If your machine has a threader, lower its lever before use.
- Insert the thread where the manual shows, then release the lever.
- If the threader fails, trim the thread end and try again.
- Pro tip: Use a slightly stiffened thread tail to help the threader catch.
Quick Brand-Specific Checklist
- Find your model number.
- Open the manual diagram and follow it step-by-step.
- Clean the bobbin area before inserting a new bobbin.
- Raise the needle and lift the presser foot while threading.
- Turn the handwheel toward you to bring up the bobbin thread.
- Test on scrap fabric and adjust tension if needed.
Always follow the machine’s diagram and manual. However, if you still struggle, find a short tutorial video for your exact model. That visual help often clears confusion quickly.
Pro Tips from Experience
These are short, high-value tips you can add to your article. Each tip is followed by a one-line reason.
- Thread with both hands for control.
It steadies the thread and prevents it from slipping off the guides. - Use quality thread to reduce lint.
Good thread feeds smoothly and breaks less often. - Thread front → back through the needle.
Always thread the needle from front to back on home machines. - Lift the presser foot while threading.
This opens the tension discs so the thread seats correctly. - Clean the bobbin area weekly.
Lint causes jams and poor stitches. A quick brush helps a lot. - Turn the handwheel toward you when bringing up thread.
Turning the other way can tangle the hook assembly. - Keep spare, correct bobbins labeled by model.
Wrong bobbins cause tension problems. Label avoids mix-ups. - Change needles regularly.
A dull or bent needle causes skipped stitches and fabric damage. - Wind bobbins evenly and not fully.
Stop at about two-thirds full to avoid uneven feed.
Test on scrap fabric after threading.
A quick test saves real fabric and time.
Maintenance & Best Practices
Good care keeps your machine happy. It also prevents threading problems and poor stitches. Follow these simple steps.
Daily / Before You Sew
- Turn the machine off and unplug it. Safety first.
- Raise the needle and lift the presser foot. This readies tension discs.
- Check the bobbin area for lint. Use a small brush to clear it.
- Use a fresh needle if you change fabric types. This avoids skipped stitches.
- Keep your manual or threading diagram handy. Refer to it when unsure.
Weekly
- Brush lint from the bobbin area and feed dogs. Do this after heavy use.
- Wipe external surfaces with a soft, dry cloth. Avoid harsh cleaners.
- Check screw tightness on the needle clamp and presser foot. Tighten gently if needed.
Monthly
- Inspect and replace needles if dull or bent. Change needles every 6–8 hours of sewing.
- Replace or check bobbins for damage and the correct size. Wrong bobbins harm tension.
- Test stitch quality on scrap fabric. Adjust tension in small steps as needed.
Oiling (Only if your manual allows)
- Read the manual before oiling. Not all machines need user oiling.
- Use manufacturer-approved oil only. A drop in the hook area often suffices.
- Wipe excess oil immediately. Too much oil attracts lint and dirt.
Needle & Thread Care
- Match needle to fabric and thread weight. This reduces breaks and skipped stitches.
- Use good quality, low-lint thread. It feeds smoother and leaves less fluff.
- Trim thread tails before sewing. Short clean tails reduce snags.
Storage & Handling
- Cover the machine when not in use. Dust harms moving parts.
- Store spare bobbins and needles labeled by model. That avoids mix-ups.
- Carry the machine by its base. This prevents damage to delicate parts.
Safety Reminders
- Always unplug before cleaning or changing needles. Never work on a live machine.
- Keep fingers away from the needle when testing. Use tweezers for thread tails.
- Do not force stuck parts. Forcing can break parts or misalign timing.
Quick Maintenance Checklist (two-minute)
- Unplug the machine.
- Raise the needle and presser foot.
- Brush bobbin area.
- Check needle condition.
- Load bobbin and test stitch on scrap.
When to Call a Technician
- Unusual metal sounds after cleaning or oiling.
- Persistent skipped stitches after re-threading and tension checks.
- Suspected timing issues between the needle and hook.
Conclusion & Call-to-Action
Threading a sewing machine can feel tricky at first, but with the right steps, it becomes second nature. Once you understand the threading path, you’ll spend more time sewing and less time fixing mistakes.
If you’ve had any threading mishaps or proud “I nailed it!” moments, share them in the comments. Your story might help someone else avoid a tangled mess.
Once your machine is threaded, keep it running smoothly by following our guide on how to oil a sewing machine.

